Saturday, 13 October 2012

How to generate PDF file in android

By Sukhpal Saini

Hi friends....

I am trying to generate a pdf file in android OS with android coding but its not possible with iText packages(used in java for generate a pdf file in windows) because Google android does not accepts to include iText in the application. Because android has separate virtual machine (Dalvik) and it does not support all java classes.

So i found a new solution for this problem now i am using pdflib for generate the pdf documents in android OS.

use this code for generate the pdf document in android

hello_android.java
package com.pdflib;

import java.io.File;

import android.app.Activity;
import android.os.Bundle;
import android.os.Environment;
import android.view.View;
import android.view.View.OnClickListener;
import android.widget.Button;
import android.widget.EditText;
import android.widget.TextView;
import android.util.Log;

public class hello_android extends Activity implements OnClickListener {
    TextView textResult;
    Button buttonGo;
    EditText editInput;
    private static final String TAG = "PDFlib";

    @Override
    public void onCreate(Bundle savedInstanceState) {
        super.onCreate(savedInstanceState);
        setContentView(R.layout.main);

        // Find UI views
        textResult = (TextView) findViewById(R.id.textResult);
        buttonGo = (Button) findViewById(R.id.buttonGo);
        buttonGo.setOnClickListener(this);
    }

    public void onClick(View view) {
        String out = "OK";
        /* This is where the data files are. Adjust as necessary. */
        final String searchpath = "/data/data/com.pdflib/data";
        File sdCard = Environment.getExternalStorageDirectory();
        File dir = new File(sdCard.getAbsolutePath()
    + "/stericheck.pdf");
        final String outfile = ""+dir;
        /*
         * example how to switch on logging 
        final String logging = "filename=/data/data/com.pdflib/trace.txt";
         */
        pdflib p = null;
        int font;


        try {
            p = new pdflib();

            /*
             *p.set_parameter("logging", logging);
             */
            p.set_parameter("SearchPath", searchpath);


            /* This means we must check return values of load_font() etc. */
            p.set_parameter("errorpolicy", "return");

            if (p.begin_document(outfile, "") == -1)
                throw new Exception("Error: " + p.get_errmsg());

            p.set_info("Creator", "hello.java");
            p.set_info("Author", "Thomas Merz");
            p.set_info("Title", "Hello world (Java)!");

            p.begin_page_ext(595, 842, "");

            font = p.load_font("Helvetica-Bold", "unicode", "");

            if (font == -1)
                throw new Exception("Error: " + p.get_errmsg());

            p.setfont(font, 24);

            p.set_text_pos(50, 700);
            p.show("Hello world!");
            p.continue_text("(says Java)");
            p.end_page_ext("");

            p.end_document("");

        }
        catch (PDFlibException e) {
            out = "PDFlib exception" + "[" + e.get_errnum() + "] "
                + e.get_apiname() + ": " + e.get_errmsg() + "\n";
            Log.d(TAG, out);
        }
        catch (Exception e) {
            out = "Exception: " + e.getMessage();
            Log.d(TAG, out);
        }
        finally {
            if (p != null) {
                p.delete();
            }
        }

        textResult.setText(out);
    }
}

also add two another java files put in Package

 Link for download the sample project of PDF creator project is given below


Sample PDF creator Project


And For another help in this creator contact to me.....


My English is so weak sorry for spelling mistakes and sentence mistakes  


Please send a feedback after view this post.....

Wednesday, 8 August 2012

How to use Date Picker...

By sukhpal saini

A DatePicker is a widget that allows the user to select a month, day and year.


Create a new Android Application, AndroidDatePicker.

Modify the layout, main.xml, to add a button to start the DatePicker.


<?xml version="1.0" encoding="utf-8"?>
<LinearLayout xmlns:android="http://schemas.android.com/apk/res/android"
    android:orientation="vertical"
    android:layout_width="fill_parent"
    android:layout_height="fill_parent"
    >
<TextView  
    android:layout_width="fill_parent" 
    android:layout_height="wrap_content" 
    android:text="@string/hello"
    />
<Button
    android:id="@+id/datepickerbutton"
    android:layout_width="fill_parent" 
    android:layout_height="wrap_content" 
    android:text="DatePicker"
 />
</LinearLayout>


Modify the main program, AndroidDatePicker.java.

package com.exercise.AndroidDatePicker;

import java.util.Calendar;

import android.app.Activity;
import android.app.DatePickerDialog;
import android.app.Dialog;
import android.os.Bundle;
import android.view.View;
import android.widget.Button;
import android.widget.DatePicker;
import android.widget.Toast;

public class AndroidDatePicker extends Activity {
 
 private int myYear, myMonth, myDay;
 static final int ID_DATEPICKER = 0;
 
    /** Called when the activity is first created. */
    @Override
    public void onCreate(Bundle savedInstanceState) {
        super.onCreate(savedInstanceState);
        setContentView(R.layout.main);
        
        Button datePickerButton = (Button)findViewById(R.id.datepickerbutton);
        datePickerButton.setOnClickListener(datePickerButtonOnClickListener);
    }
    
    private Button.OnClickListener datePickerButtonOnClickListener
     = new Button.OnClickListener(){

   @Override
   public void onClick(View v) {
    // TODO Auto-generated method stub
    final Calendar c = Calendar.getInstance();
    myYear = c.get(Calendar.YEAR);
    myMonth = c.get(Calendar.MONTH);
    myDay = c.get(Calendar.DAY_OF_MONTH);
    showDialog(ID_DATEPICKER);
   }
    };

 @Override
 protected Dialog onCreateDialog(int id) {
  // TODO Auto-generated method stub
  switch(id){
   case ID_DATEPICKER:
    Toast.makeText(AndroidDatePicker.this, 
      "- onCreateDialog -", 
      Toast.LENGTH_LONG).show();
    return new DatePickerDialog(this,
      myDateSetListener,
      myYear, myMonth, myDay);
   default:
    return null;
  }
 }
    
 private DatePickerDialog.OnDateSetListener myDateSetListener
  = new DatePickerDialog.OnDateSetListener(){
   @Override
   public void onDateSet(DatePicker view, int year, 
     int monthOfYear, int dayOfMonth) {
    // TODO Auto-generated method stub
    String date = "Year: " + String.valueOf(year) + "\n"
     + "Month: " + String.valueOf(monthOfYear+1) + "\n"
     + "Day: " + String.valueOf(dayOfMonth);
    Toast.makeText(AndroidDatePicker.this, date, 
      Toast.LENGTH_LONG).show();
   } 
 };
}


A Toast will be displayed in onCreateDialog(), to show that DatePickerDialog() will be created once only (in the first time display the dialog).

How to install .apk file in Emulator (Android 4.0.3 Ver.)

By Sukhpal Saini


download sdk zip file from this link size 471mb

http://www.4shared.com/rar/coomn8TQ/android-sdk-windows.html?refurl=d1url

open above link and click on download now button the sign up for new account or login with existing account.......then download

extract the android-sdk-windows  file in any location of ur hard disk (in my case it is located in D: drive) then follow the images one by one  1 to 8


then

 Copy .APK files:
Now, manually copy and paste the SterilityTestSystem.apk(your .apk file)  to the destination folder "D:\android-sdk-windows\platform-tools\".

wait for start emulator like image 8
Run adb command:
Go to Start>>run>>cmd (open a windows command prompt or shell) and type the following commands "highlighted in bold orange".
cd d:\android-sdk-windows\platform-tools\
comments: we do this in order to change our directory level to where the emulator is installed

adb install Sudoku.apk 
comments: android emulator command to install the SterilityTestSystem application in .apk format.
Thats all, it's done. You must get a success message, Hurray!! You have installed your application successfully.
then check application in apps category of emulator

Thursday, 19 July 2012

android and arduino connection

Arduino ADK Board: Blink an LED With Your Phone, Minimum Code Required

by sukhpal saini
I recently bought an Arduino ADK board, after downloading the sample code I was overwhelmed with the amount of C and Java code I saw. Furthermore the sample code requires that you have all these sensors that are sold separately on top of the already expensive board, and this is supposed to be a beginners board?
But enough with the rant, I’ve managed to trimmed the C and JAVA down to what is only necessary to blink the built in LED in the Arduino, the full code and explanation is here, please spread it around.

The App’s Interface

The Android app consists of a toggle button which we’ll use to toggle the state, on or off, of the LED. In Android user interfaces are called layouts, so let’s make a layout with a toggle button.
android toggle button
Android app interface as seen in phone
The ToggleButton xml tag has several properties including dimensions (width and height), position, text size and the ID and onClick attributes. The ID attribute is used to identify inputs (buttons, check boxes etc) in our Java code, the onClick attribute is the function which will executed upon a click.

File: layout/main.xml
  1. <?xml version="1.0" encoding="utf-8"?>
  2. <RelativeLayout android:layout_width="fill_parent"
  3. android:id="@+id/relativeLayout1"
  4. android:layout_height="fill_parent"
  5. android:layout_weight="0.72" xmlns:android="http://schemas.android.com/apk/res/android">
  6. <ToggleButton
  7. android:text="ToggleButton"
  8. android:id="@+id/toggleButtonLED"
  9. android:layout_width="500px"
  10. android:layout_height="200px"
  11. android:layout_centerVertical="true"
  12. android:layout_centerHorizontal="true"
  13. android:textSize="50px"
  14. android:onClick="blinkLED"></ToggleButton>
  15. </RelativeLayout>
In the code above, our button’s ID is toggleButtonLED and the function to execute when it’s clicked is blinkLED.

Asking For Permission

Whenever you download an app, if you don’t just click OK on everything without reading, you’ll notice that it lists some permissions that it requires from the device. All these permissions are listed in the Android manifest file ("manifest"? LOL sounds like a peace treaty doesn’t it?), we need to list our USB permissions in this file.

File: AndroidManifest.xml
  1. <?xml version="1.0" encoding="utf-8"?>
  2. <manifest xmlns:android="http://schemas.android.com/apk/res/android"
  3. package="com.yoursite.arduinoblinkled" android:versionCode="1"
  4. android:versionName="1.0">
  5. <uses-sdk android:minSdkVersion="13" />
  6.  
  7. <application android:icon="@drawable/icon" android:label="@string/app_name">
  8. <activity android:name=".ArduinoBlinkLEDActivity"
  9. android:label="@string/app_name">
  10. <intent-filter>
  11. <action android:name="android.intent.action.MAIN" />
  12. <category android:name="android.intent.category.LAUNCHER" />
  13. </intent-filter>
  14. <intent-filter>
  15. <action android:name="android.hardware.usb.action.USB_ACCESSORY_ATTACHED" />
  16. </intent-filter>
  17. <meta-data android:name="android.hardware.usb.action.USB_ACCESSORY_ATTACHED"
  18. android:resource="@xml/accessory_filter" />
  19. </activity>
  20. <uses-library android:name="com.android.future.usb.accessory"></uses-library>
  21.  
  22. </application>
  23. </manifest>
Be sure to change the minSdkVersion to the Android SDK version your project is using.

How To Route Your USB Device To The Correct Application

android message of new usb device connection
The message you'll get when you connect your board to the Android device

Whenever you connect your board the Android device (phone or table) will need to know which app the board uses, we do that with this file.
File: accessory_filter.xml
  1. <?xml version="1.0" encoding="utf-8"?>
  2. <resources>
  3. <usb-accessory manufacturer="Manufacturer" model="Model" version="1.0" />
  4. </resources>
You may change the values in the attributes but they will have to same as in the Arduino file.

How To Handle The Clicks, Send Data To The Board

The following code is part of the ArduinoBlinkLED.java file, don’t worry about where it goes for now, I will tell you that later, for now just understand the following explanations.
To make our button be recognized by Java we need to store it in an object. So we declared our object as a ToggleButton object:
  1. private ToggleButton buttonLED;
Then we store our button in the buttonLED object:
  1. // toggleButtonLED is the name we used in the layout/main.xml code above.
  2. buttonLED = (ToggleButton) findViewById(R.id.toggleButtonLED);
We also need to load the layout into our app.
  1. // main comes from our interface's file name: main.xml
  2. setContentView(R.layout.main);
To handle the button clicks we’ll need to make the function blinkLED, just as we promised in the layout/main.xml code above. This is the function’s code:

  1. public void blinkLED(View v){
  2.  
  3. byte[] buffer = new byte[1];
  4. if(buttonLED.isChecked())
  5. buffer[0]=(byte)0; // button says on, light is off
  6. else
  7. buffer[0]=(byte)1; // button says off, light is on
  8. if (mOutputStream != null) {
  9. try {
  10. mOutputStream.write(buffer);
  11. } catch (IOException e) {
  12. Log.e(TAG, "write failed", e);
  13. }
  14. }
  15. }
What we are doing here is we are making a byte array which will hold the value 0 if the button is checked and the value 1 if it’s not checked, read the comments in the code. The byte is sent to the Arduino ADK board by the write function.
We’ll continue in the same file on the next section.

Android Arduino Communication

The code that handles USB communication is standard code you’ll need for all your apps, you can either not worry about it or simply check out each function and by the variable names am confident you’ll understand what it’s doing, also in the code to handle clicks is included here. Am sorry I can’t explain each piecebut as you’ll see it could take a while, but the important part is what I explained above.
We only need ONE java file, not 100′s like the "demo" version and here it is.

File: ArduinoBlinkLED.java
  1. package com.yoursite.arduinoblinkled;
  2.  
  3. import java.io.FileDescriptor;
  4. import java.io.FileInputStream;
  5. import java.io.FileOutputStream;
  6. import java.io.IOException;
  7.  
  8. import android.app.Activity;
  9. import android.app.PendingIntent;
  10. import android.content.BroadcastReceiver;
  11. import android.content.Context;
  12. import android.content.Intent;
  13. import android.content.IntentFilter;
  14. import android.os.Bundle;
  15. import android.os.ParcelFileDescriptor;
  16. import android.util.Log;
  17. import android.view.View;
  18. import android.widget.ToggleButton;
  19.  
  20. import com.android.future.usb.UsbAccessory;
  21. import com.android.future.usb.UsbManager;
  22.  
  23. public class ArduinoBlinkLEDActivity extends Activity {
  24.  
  25. // TAG is used to debug in Android logcat console
  26. private static final String TAG = "ArduinoAccessory";
  27.  
  28. private static final String ACTION_USB_PERMISSION = "com.google.android.DemoKit.action.USB_PERMISSION";
  29.  
  30. private UsbManager mUsbManager;
  31. private PendingIntent mPermissionIntent;
  32. private boolean mPermissionRequestPending;
  33. private ToggleButton buttonLED;
  34.  
  35. UsbAccessory mAccessory;
  36. ParcelFileDescriptor mFileDescriptor;
  37. FileInputStream mInputStream;
  38. FileOutputStream mOutputStream;
  39.  
  40. private final BroadcastReceiver mUsbReceiver = new BroadcastReceiver() {
  41. @Override
  42. public void onReceive(Context context, Intent intent) {
  43. String action = intent.getAction();
  44. if (ACTION_USB_PERMISSION.equals(action)) {
  45. synchronized (this) {
  46. UsbAccessory accessory = UsbManager.getAccessory(intent);
  47. if (intent.getBooleanExtra(
  48. UsbManager.EXTRA_PERMISSION_GRANTED, false)) {
  49. openAccessory(accessory);
  50. } else {
  51. Log.d(TAG, "permission denied for accessory "
  52. + accessory);
  53. }
  54. mPermissionRequestPending = false;
  55. }
  56. } else if (UsbManager.ACTION_USB_ACCESSORY_DETACHED.equals(action)) {
  57. UsbAccessory accessory = UsbManager.getAccessory(intent);
  58. if (accessory != null && accessory.equals(mAccessory)) {
  59. closeAccessory();
  60. }
  61. }
  62. }
  63. };
  64.  
  65.  
  66. @Override
  67. public void onCreate(Bundle savedInstanceState) {
  68. super.onCreate(savedInstanceState);
  69.  
  70. mUsbManager = UsbManager.getInstance(this);
  71. mPermissionIntent = PendingIntent.getBroadcast(this, 0, new Intent(ACTION_USB_PERMISSION), 0);
  72. IntentFilter filter = new IntentFilter(ACTION_USB_PERMISSION);
  73. filter.addAction(UsbManager.ACTION_USB_ACCESSORY_DETACHED);
  74. registerReceiver(mUsbReceiver, filter);
  75.  
  76. if (getLastNonConfigurationInstance() != null) {
  77. mAccessory = (UsbAccessory) getLastNonConfigurationInstance();
  78. openAccessory(mAccessory);
  79. }
  80.  
  81. setContentView(R.layout.main);
  82. buttonLED = (ToggleButton) findViewById(R.id.toggleButtonLED);
  83. }
  84.  
  85. @Override
  86. public Object onRetainNonConfigurationInstance() {
  87. if (mAccessory != null) {
  88. return mAccessory;
  89. } else {
  90. return super.onRetainNonConfigurationInstance();
  91. }
  92. }
  93.  
  94. @Override
  95. public void onResume() {
  96. super.onResume();
  97.  
  98. if (mInputStream != null && mOutputStream != null) {
  99. return;
  100. }
  101.  
  102. UsbAccessory[] accessories = mUsbManager.getAccessoryList();
  103. UsbAccessory accessory = (accessories == null ? null : accessories[0]);
  104. if (accessory != null) {
  105. if (mUsbManager.hasPermission(accessory)) {
  106. openAccessory(accessory);
  107. } else {
  108. synchronized (mUsbReceiver) {
  109. if (!mPermissionRequestPending) {
  110. mUsbManager.requestPermission(accessory,mPermissionIntent);
  111. mPermissionRequestPending = true;
  112. }
  113. }
  114. }
  115. } else {
  116. Log.d(TAG, "mAccessory is null");
  117. }
  118. }
  119.  
  120. @Override
  121. public void onPause() {
  122. super.onPause();
  123. closeAccessory();
  124. }
  125.  
  126. @Override
  127. public void onDestroy() {
  128. unregisterReceiver(mUsbReceiver);
  129. super.onDestroy();
  130. }
  131.  
  132. private void openAccessory(UsbAccessory accessory) {
  133. mFileDescriptor = mUsbManager.openAccessory(accessory);
  134. if (mFileDescriptor != null) {
  135. mAccessory = accessory;
  136. FileDescriptor fd = mFileDescriptor.getFileDescriptor();
  137. mInputStream = new FileInputStream(fd);
  138. mOutputStream = new FileOutputStream(fd);
  139. Log.d(TAG, "accessory opened");
  140. } else {
  141. Log.d(TAG, "accessory open fail");
  142. }
  143. }
  144.  
  145.  
  146. private void closeAccessory() {
  147. try {
  148. if (mFileDescriptor != null) {
  149. mFileDescriptor.close();
  150. }
  151. } catch (IOException e) {
  152. } finally {
  153. mFileDescriptor = null;
  154. mAccessory = null;
  155. }
  156. }
  157.  
  158. public void blinkLED(View v){
  159.  
  160. byte[] buffer = new byte[1];
  161.  
  162. if(buttonLED.isChecked())
  163. buffer[0]=(byte)0; // button says on, light is off
  164. else
  165. buffer[0]=(byte)1; // button says off, light is on
  166.  
  167. if (mOutputStream != null) {
  168. try {
  169. mOutputStream.write(buffer);
  170. } catch (IOException e) {
  171. Log.e(TAG, "write failed", e);
  172. }
  173. }
  174. }
  175.  
  176. }

How To Receive Data From The Android Device

Here comes the easy part. This is the only Arduino code you need. Notice how the manufacturer, model and version values matches that of our accessory_filter.xml file, if any of these change your board will not know which app to load.

  1. #include <Max3421e.h>
  2. #include <Usb.h>
  3. #include <AndroidAccessory.h>
  4. #define LED_PIN 13
  5. AndroidAccessory acc("Manufacturer",
  6. "Model",
  7. "Description",
  8. "1.0",
  9. "http://yoursite.com",
  10. "0000000012345678");
  11. void setup()
  12. {
  13. // set communiation speed
  14. Serial.begin(115200);
  15. pinMode(LED_PIN, OUTPUT);
  16. acc.powerOn();
  17. }
  18.  
  19. void loop()
  20. {
  21. byte msg[0];
  22. if (acc.isConnected()) {
  23. int len = acc.read(msg, sizeof(msg), 1); // read data into msg variable
  24. if (len > 0) {
  25. if (msg[0] == 1) // compare received data
  26. digitalWrite(LED_PIN,HIGH); // turn on light
  27. else
  28. digitalWrite(LED_PIN,LOW); // turn off light
  29. }
  30. }
  31. else
  32. digitalWrite(LED_PIN , LOW); // turn off light
  33. }
  34.  

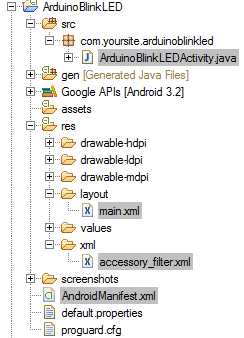
File Locations

Just in case you don’t know where the code I gave you goes:
location of the files
the location of the files as seen in eclipse

Video link..........
android and arduino usb connection video

Arduino ADK Board: Blink an LED With Your Phone, Minimum Code Required

Arduino ADK Board: Blink an LED With Your Phone, Minimum Code Required

by Miguel on December 31, 2011
I recently bought an Arduino ADK board, after downloading the sample code I was overwhelmed with the amount of C and Java code I saw. Furthermore the sample code requires that you have all these sensors that are sold separately on top of the already expensive board, and this is supposed to be a beginners board?
But enough with the rant, I’ve managed to trimmed the C and JAVA down to what is only necessary to blink the built in LED in the Arduino, the full code and explanation is here, please spread it around.

The App’s Interface

The Android app consists of a toggle button which we’ll use to toggle the state, on or off, of the LED. In Android user interfaces are called layouts, so let’s make a layout with a toggle button.
android toggle button
Android app interface as seen in phone
The ToggleButton xml tag has several properties including dimensions (width and height), position, text size and the ID and onClick attributes. The ID attribute is used to identify inputs (buttons, check boxes etc) in our Java code, the onClick attribute is the function which will executed upon a click.
File: layout/main.xml
  1. <?xml version="1.0" encoding="utf-8"?>
  2. <RelativeLayout android:layout_width="fill_parent"
  3. android:id="@+id/relativeLayout1"
  4. android:layout_height="fill_parent"
  5. android:layout_weight="0.72" xmlns:android="http://schemas.android.com/apk/res/android">
  6. <ToggleButton
  7. android:text="ToggleButton"
  8. android:id="@+id/toggleButtonLED"
  9. android:layout_width="500px"
  10. android:layout_height="200px"
  11. android:layout_centerVertical="true"
  12. android:layout_centerHorizontal="true"
  13. android:textSize="50px"
  14. android:onClick="blinkLED"></ToggleButton>
  15. </RelativeLayout>
In the code above, our button’s ID is toggleButtonLED and the function to execute when it’s clicked is blinkLED.

Asking For Permission

Whenever you download an app, if you don’t just click OK on everything without reading, you’ll notice that it lists some permissions that it requires from the device. All these permissions are listed in the Android manifest file ("manifest"? LOL sounds like a peace treaty doesn’t it?), we need to list our USB permissions in this file.
File: AndroidManifest.xml
  1. <?xml version="1.0" encoding="utf-8"?>
  2. <manifest xmlns:android="http://schemas.android.com/apk/res/android"
  3. package="com.yoursite.arduinoblinkled" android:versionCode="1"
  4. android:versionName="1.0">
  5. <uses-sdk android:minSdkVersion="13" />
  6.  
  7. <application android:icon="@drawable/icon" android:label="@string/app_name">
  8. <activity android:name=".ArduinoBlinkLEDActivity"
  9. android:label="@string/app_name">
  10. <intent-filter>
  11. <action android:name="android.intent.action.MAIN" />
  12. <category android:name="android.intent.category.LAUNCHER" />
  13. </intent-filter>
  14. <intent-filter>
  15. <action android:name="android.hardware.usb.action.USB_ACCESSORY_ATTACHED" />
  16. </intent-filter>
  17. <meta-data android:name="android.hardware.usb.action.USB_ACCESSORY_ATTACHED"
  18. android:resource="@xml/accessory_filter" />
  19. </activity>
  20. <uses-library android:name="com.android.future.usb.accessory"></uses-library>
  21.  
  22. </application>
  23. </manifest>
Be sure to change the minSdkVersion to the Android SDK version your project is using.

How To Route Your USB Device To The Correct Application

android message of new usb device connection
The message you'll get when you connect your board to the Android device

Whenever you connect your board the Android device (phone or table) will need to know which app the board uses, we do that with this file.
File: accessory_filter.xml
  1. <?xml version="1.0" encoding="utf-8"?>
  2. <resources>
  3. <usb-accessory manufacturer="Manufacturer" model="Model" version="1.0" />
  4. </resources>
You may change the values in the attributes but they will have to same as in the Arduino file.

How To Handle The Clicks, Send Data To The Board

The following code is part of the ArduinoBlinkLED.java file, don’t worry about where it goes for now, I will tell you that later, for now just understand the following explanations.
To make our button be recognized by Java we need to store it in an object. So we declared our object as a ToggleButton object:
  1. private ToggleButton buttonLED;
Then we store our button in the buttonLED object:
  1. // toggleButtonLED is the name we used in the layout/main.xml code above.
  2. buttonLED = (ToggleButton) findViewById(R.id.toggleButtonLED);
We also need to load the layout into our app.
  1. // main comes from our interface's file name: main.xml
  2. setContentView(R.layout.main);
To handle the button clicks we’ll need to make the function blinkLED, just as we promised in the layout/main.xml code above. This is the function’s code:
  1. public void blinkLED(View v){
  2.  
  3. byte[] buffer = new byte[1];
  4. if(buttonLED.isChecked())
  5. buffer[0]=(byte)0; // button says on, light is off
  6. else
  7. buffer[0]=(byte)1; // button says off, light is on
  8. if (mOutputStream != null) {
  9. try {
  10. mOutputStream.write(buffer);
  11. } catch (IOException e) {
  12. Log.e(TAG, "write failed", e);
  13. }
  14. }
  15. }
What we are doing here is we are making a byte array which will hold the value 0 if the button is checked and the value 1 if it’s not checked, read the comments in the code. The byte is sent to the Arduino ADK board by the write function.
We’ll continue in the same file on the next section.

Android Arduino Communication

The code that handles USB communication is standard code you’ll need for all your apps, you can either not worry about it or simply check out each function and by the variable names am confident you’ll understand what it’s doing, also in the code to handle clicks is included here. Am sorry I can’t explain each piecebut as you’ll see it could take a while, but the important part is what I explained above.
We only need ONE java file, not 100′s like the "demo" version and here it is.
File: ArduinoBlinkLED.java
  1. package com.yoursite.arduinoblinkled;
  2.  
  3. import java.io.FileDescriptor;
  4. import java.io.FileInputStream;
  5. import java.io.FileOutputStream;
  6. import java.io.IOException;
  7.  
  8. import android.app.Activity;
  9. import android.app.PendingIntent;
  10. import android.content.BroadcastReceiver;
  11. import android.content.Context;
  12. import android.content.Intent;
  13. import android.content.IntentFilter;
  14. import android.os.Bundle;
  15. import android.os.ParcelFileDescriptor;
  16. import android.util.Log;
  17. import android.view.View;
  18. import android.widget.ToggleButton;
  19.  
  20. import com.android.future.usb.UsbAccessory;
  21. import com.android.future.usb.UsbManager;
  22.  
  23. public class ArduinoBlinkLEDActivity extends Activity {
  24.  
  25. // TAG is used to debug in Android logcat console
  26. private static final String TAG = "ArduinoAccessory";
  27.  
  28. private static final String ACTION_USB_PERMISSION = "com.google.android.DemoKit.action.USB_PERMISSION";
  29.  
  30. private UsbManager mUsbManager;
  31. private PendingIntent mPermissionIntent;
  32. private boolean mPermissionRequestPending;
  33. private ToggleButton buttonLED;
  34.  
  35. UsbAccessory mAccessory;
  36. ParcelFileDescriptor mFileDescriptor;
  37. FileInputStream mInputStream;
  38. FileOutputStream mOutputStream;
  39.  
  40. private final BroadcastReceiver mUsbReceiver = new BroadcastReceiver() {
  41. @Override
  42. public void onReceive(Context context, Intent intent) {
  43. String action = intent.getAction();
  44. if (ACTION_USB_PERMISSION.equals(action)) {
  45. synchronized (this) {
  46. UsbAccessory accessory = UsbManager.getAccessory(intent);
  47. if (intent.getBooleanExtra(
  48. UsbManager.EXTRA_PERMISSION_GRANTED, false)) {
  49. openAccessory(accessory);
  50. } else {
  51. Log.d(TAG, "permission denied for accessory "
  52. + accessory);
  53. }
  54. mPermissionRequestPending = false;
  55. }
  56. } else if (UsbManager.ACTION_USB_ACCESSORY_DETACHED.equals(action)) {
  57. UsbAccessory accessory = UsbManager.getAccessory(intent);
  58. if (accessory != null && accessory.equals(mAccessory)) {
  59. closeAccessory();
  60. }
  61. }
  62. }
  63. };
  64.  
  65.  
  66. @Override
  67. public void onCreate(Bundle savedInstanceState) {
  68. super.onCreate(savedInstanceState);
  69.  
  70. mUsbManager = UsbManager.getInstance(this);
  71. mPermissionIntent = PendingIntent.getBroadcast(this, 0, new Intent(ACTION_USB_PERMISSION), 0);
  72. IntentFilter filter = new IntentFilter(ACTION_USB_PERMISSION);
  73. filter.addAction(UsbManager.ACTION_USB_ACCESSORY_DETACHED);
  74. registerReceiver(mUsbReceiver, filter);
  75.  
  76. if (getLastNonConfigurationInstance() != null) {
  77. mAccessory = (UsbAccessory) getLastNonConfigurationInstance();
  78. openAccessory(mAccessory);
  79. }
  80.  
  81. setContentView(R.layout.main);
  82. buttonLED = (ToggleButton) findViewById(R.id.toggleButtonLED);
  83. }
  84.  
  85. @Override
  86. public Object onRetainNonConfigurationInstance() {
  87. if (mAccessory != null) {
  88. return mAccessory;
  89. } else {
  90. return super.onRetainNonConfigurationInstance();
  91. }
  92. }
  93.  
  94. @Override
  95. public void onResume() {
  96. super.onResume();
  97.  
  98. if (mInputStream != null && mOutputStream != null) {
  99. return;
  100. }
  101.  
  102. UsbAccessory[] accessories = mUsbManager.getAccessoryList();
  103. UsbAccessory accessory = (accessories == null ? null : accessories[0]);
  104. if (accessory != null) {
  105. if (mUsbManager.hasPermission(accessory)) {
  106. openAccessory(accessory);
  107. } else {
  108. synchronized (mUsbReceiver) {
  109. if (!mPermissionRequestPending) {
  110. mUsbManager.requestPermission(accessory,mPermissionIntent);
  111. mPermissionRequestPending = true;
  112. }
  113. }
  114. }
  115. } else {
  116. Log.d(TAG, "mAccessory is null");
  117. }
  118. }
  119.  
  120. @Override
  121. public void onPause() {
  122. super.onPause();
  123. closeAccessory();
  124. }
  125.  
  126. @Override
  127. public void onDestroy() {
  128. unregisterReceiver(mUsbReceiver);
  129. super.onDestroy();
  130. }
  131.  
  132. private void openAccessory(UsbAccessory accessory) {
  133. mFileDescriptor = mUsbManager.openAccessory(accessory);
  134. if (mFileDescriptor != null) {
  135. mAccessory = accessory;
  136. FileDescriptor fd = mFileDescriptor.getFileDescriptor();
  137. mInputStream = new FileInputStream(fd);
  138. mOutputStream = new FileOutputStream(fd);
  139. Log.d(TAG, "accessory opened");
  140. } else {
  141. Log.d(TAG, "accessory open fail");
  142. }
  143. }
  144.  
  145.  
  146. private void closeAccessory() {
  147. try {
  148. if (mFileDescriptor != null) {
  149. mFileDescriptor.close();
  150. }
  151. } catch (IOException e) {
  152. } finally {
  153. mFileDescriptor = null;
  154. mAccessory = null;
  155. }
  156. }
  157.  
  158. public void blinkLED(View v){
  159.  
  160. byte[] buffer = new byte[1];
  161.  
  162. if(buttonLED.isChecked())
  163. buffer[0]=(byte)0; // button says on, light is off
  164. else
  165. buffer[0]=(byte)1; // button says off, light is on
  166.  
  167. if (mOutputStream != null) {
  168. try {
  169. mOutputStream.write(buffer);
  170. } catch (IOException e) {
  171. Log.e(TAG, "write failed", e);
  172. }
  173. }
  174. }
  175.  
  176. }

How To Receive Data From The Android Device

Here comes the easy part. This is the only Arduino code you need. Notice how the manufacturer, model and version values matches that of our accessory_filter.xml file, if any of these change your board will not know which app to load.
  1. #include <Max3421e.h>
  2. #include <Usb.h>
  3. #include <AndroidAccessory.h>
  4. #define LED_PIN 13
  5. AndroidAccessory acc("Manufacturer",
  6. "Model",
  7. "Description",
  8. "1.0",
  9. "http://yoursite.com",
  10. "0000000012345678");
  11. void setup()
  12. {
  13. // set communiation speed
  14. Serial.begin(115200);
  15. pinMode(LED_PIN, OUTPUT);
  16. acc.powerOn();
  17. }
  18.  
  19. void loop()
  20. {
  21. byte msg[0];
  22. if (acc.isConnected()) {
  23. int len = acc.read(msg, sizeof(msg), 1); // read data into msg variable
  24. if (len > 0) {
  25. if (msg[0] == 1) // compare received data
  26. digitalWrite(LED_PIN,HIGH); // turn on light
  27. else
  28. digitalWrite(LED_PIN,LOW); // turn off light
  29. }
  30. }
  31. else
  32. digitalWrite(LED_PIN , LOW); // turn off light
  33. }
  34.  

File Locations

Just in case you don’t know where the code I gave you goes:
location of the files
the location of the files as seen in eclipse